Crochet Headband Pattern – In Pale Yellow Bamboo Blend Yarn
This is the third and final post in a series on how to make the crochet headband pictured. Here are the two earlier posts:
DYI – How to Make a Crochet Headband – Free Pattern
Crochet Headband Pattern – Part 2
Please refer to the first post for stitch abbreviations, which are standard. Also, as I’ve previously written, if you don’t want to make the headband yourself, visit my Etsy Shop, Catalina Inspired where I have many different colors available.
Ok – on to the pattern. Now that you’ve joined all five squares, the next step is to crochet all the way around twice.
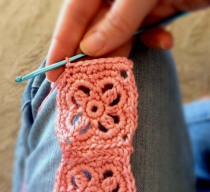
With the front side facing up, YO and insert the hook into the top right ch3 space and sc 3 times. Then sc in each sc across the end of the headband till you come to the next ch3 space but skip over the center sc. There should be 6 sc across the end, not 7. It should look like this:

Crochet Headband in Salmon Bamboo Blend Yarn – Finish Step 1
Sc 5 times in the corner ch3 space. Sc in each sc to the next ch3 space. If you followed the pattern exactly there should be 7 sc along each square side. 2 sc in ch3 space. Insert the hook into one of the stitches made to sew the squares together (two layers of yarn), pull up a loop and sc. 2 sc in next ch 3 space. Here’s what it should look like so far:

Crochet Headband in Salmon Pink Bamboo Blend Yarn – Finish Step 2
Continue with 7 sc, 2 sc in ch 3 space, sc in between squares and 2sc in ch3 space until you get to the next corner. 5 sc in the corner ch 3 space and 6 sc across headband end, skipping over the center stitch which prevents the end from puckering. 5 sc in next corner and continue crocheting the second side, the same as the first. When you get to the end, sc 2 in the first ch3 space and sl st in first sc. It should look like this:

Crochet Headband in Salmon Pink Bamboo Blend Yarn – Finish Step 3
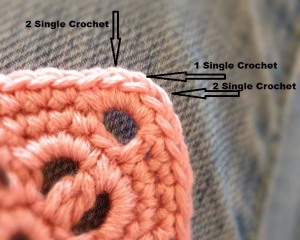
For the next round, sc in each sc all the way around except for at the corners. See picture for instructions on the corners.

Crochet Headband – Corner Detail Instructions
Each corner should look like this when finished:

Crochet Headband – Corner Detail Finished
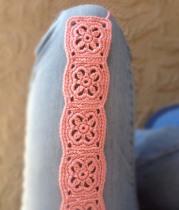
Continue all the way around, slip stitch with the first sc and tie off. It should now look like this:

Crochet Headband – Finish Step 4
After tying off, yarn over and insert the hook into center sc at right corner. Ch1. Sc in each sc across until you reach the center corner sc on the left side. Ch1, skip 1st sc and sc across to the 1st sc on previous row. Ch1, skip 1st sc and sc in each sc across to the 1st sc in the previous row. Continue to decrease stitches until there are 6 sc across. Now it should look like this:

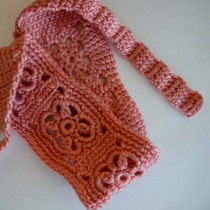
Now, after you’ve decreased to 6 stitches, ch 2 then dc across all 6 sc. Continue making rows of 6 dc until the tie is long enough. To measure, place the center square of the headband on the top of your head and pull the tie down until it’s long enough to tie a square knot with. When you think it’s long enough, tie off and repeat the same instructions on the opposite side. If it turns out that the tie isn’t long enough when you finish, just add a few more rows until it’s the perfect length. Then weave in any loose ands and trim. Here’s the finished product. 
I hope these crazy instructions, though a bit unorthodox, were understandable. If not, please comment on anything you don’t understand and I’ll try to clear up any confusion. I used a lot of pictures for this pattern, but as I wrote in the first post, I’ve never actually written one of my patterns down. I found it a bid difficult to communicate something that I’ve done intuitively for so long. So, again, I apologize if it didn’t make sense. Happy hooking !

jenny
/ March 5, 2013You did an AMAZING job with the tute.
Thanks for sharing.
Very nice design.
perdida01
/ March 5, 2013Thank you! It’s great to get feedback so I know I was able to get my idea across! LOL :)
Liset
/ June 21, 2013Such an awesome headband! I’m making mine so that I can keep my ears warm while I run on the beach! I love the granny square feel of it, as I am currently OBSESSED with granny squares! The only problem is I’m not sure how much yarn is needed, I hope I don’t run out!
perdida01
/ June 22, 2013Thank you for your comment! I’m glad you like the design. I have an actual granny square headband in my shop but I haven’t written out the pattern. Of course, if you know how to crochet a granny square, it’s pretty self explanatory I suppose. It didn’t even occur to me to write how much yarn was needed for the pattern. Oops – that’s kind of an important detail I left out! If you use the Caron Spa yarn (which I can’t seem to find anymore) I can usually make three or four headbands with one ball. Thank you for pointing out my rather glaring omission! Happy hooking!
Bella
/ October 14, 2013Thanks for sharing your pattern… the headband is truly amazing. Can’t wait to make it. Btw I love that you added pictures, I am new to this so the pictures are a lot of help. :)
perdida01
/ October 14, 2013Thank you so much for your comment! I hope your headband turns out well. If you have any questions, don’t hesitate to ask. The main reason I added the photos was because I wasn’t confident that just my words would be sufficient. I’ve followed many crochet and knitting patterns but it was my first stab at writing one. Thank you again!
Kristy
Gammagirl
/ June 25, 2014Just finished! Mine looks a little rough (I used peaches and creme cotton yarn) but I think I’ll try another one maybe with a softer yarn. Each square looked a little better than the last. :) Thank you so much for sharing! I’m excited to wear it.
perdida01
/ June 25, 2014Thanks for your comment! Yeah – they definitely get smoother the more you do. I’ve made hundreds of these headbands and I still enjoy crocheting them amazingly enough! The peaches and creme yarn might be a little heavy. For cotton, try Paton Grace yarn with a D/3 hook. It’s the perfect weight for these headbands. Thanks again!
Kristy
zahra
/ October 4, 2014Thanks for the pattern, i followed the previos 2 parts.. they are easy and clear to follow up
But in this part i feel confuse
Where to sc 3 times? In the middle of the 3 ch space or from the middle ch3 space all across? And how i get only 6 stitches at the end?? Based on what i understood, i have 13 stitshes from the right corner to the lift
Could you please explain to me again?
Regards,
Zahra
zahra
/ October 4, 2014I didn’t get the first row, plz help it urgent
Thanks again for the pattern..
perdida01
/ October 4, 2014Stand by. I’m checking it now. I’ll be with you in a few minutes. Thanks!
perdida01
/ October 4, 2014OK – I can see how you would be confused. I wasn’t too clear on this. While holding the headband with a short side on top, start in the right corner and sc 3 in the ch3 space. Then sc 8 across, skipping the center sc (unless it’s too tight or the edges start curling up – then add the center stitch back in). Then when you’re at the next corner ch 3 space, sc 5. Then, proceed across the long side sc 2 in each ch 3 space and sc in each sc skipping center sc as in the short side if needed.
I’m so sorry for the confusion. I’m surprised you’re the first one to notice my error. If this still doesn’t make sense, let me know. Thanks!
zahra
/ October 4, 2014Thanks for help, now it’s more clear
But still !! I dont get the center sc
I have 8 sc each side of the squares and 3 ch spaces.. so which sc do you mean?
I relly appriciate your help.. thanks
perdida01
/ October 4, 2014Ok, now that I’m really looking at it I’m getting confused too. You’re right! Somehow the numbers aren’t quite right. Geez! Does the headband look nice and flat without puckering or curling with the 8 sc across and 5 sc in each ch 3 space? If so, I’d forget about skipping the center sc and just keep going as you are. I think when I wrote the pattern, since I was using the bamboo yarn which tends to pucker, I took out a sc to flatten it, but with wool or cotton yarn there wasn’t any need. I usually just eyeball the piece and take out or add sc as needed since all yarns are slightly different. See what you think. If you’re not sure, take a photo and email it to me at envirella@live.com. So sorry for all the confusion. I think I need to go back and re-read this post!
zahra
/ October 11, 2014No need to be sorry, I’m fine
I finished it in the same day but i have been busy, so i just email you to shaw the result, plz check your email
Thanks..
Jade
/ September 21, 2015Thank you for sharing your pattern, I just finished making one and it is so cute. I will be making again. Thanks!