Crochet Headband Pattern – Part 3

Crochet Headband Pattern - In Pale Yellow Bamboo Blend Yarn

Crochet Headband Pattern – In Pale Yellow Bamboo Blend Yarn

 This is the third and final post in a series on how to make the crochet headband pictured.  Here are the two earlier posts:

DYI – How to Make a Crochet Headband – Free Pattern

Crochet Headband Pattern – Part 2  

Please refer to the first post for stitch abbreviations, which are standard.   Also, as I’ve previously written, if you don’t want to make the headband yourself, visit my Etsy Shop, Catalina Inspired where I have many different colors available.

Ok – on to the pattern.  Now that you’ve joined all five squares, the next step is to crochet all the way around twice.   

With the front side facing up, YO and insert the hook into the top right ch3 space and sc 3 times.  Then sc in each sc across the end of the headband till you come to the next ch3 space but skip over the center sc.  There should be 6 sc across the end, not 7.  It should look like this:
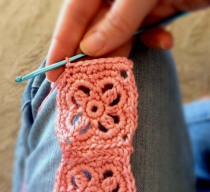
Crochet Headband in Salmon Bamboo Blend Yarn - Finish Step 1

Crochet Headband in Salmon Bamboo Blend Yarn – Finish Step 1

 Sc 5 times in the corner ch3 space.  Sc in each sc to the next ch3 space.  If you followed the pattern exactly there should be 7 sc along each square side.  2 sc in ch3 space.  Insert the hook into one of the stitches made to sew the squares together (two layers of yarn), pull up a loop and sc.  2 sc in next ch 3 space.  Here’s what it should look like so far:

Crochet Headband in Salmon Pink Bamboo Blend Yarn - Finish Step 2

Crochet Headband in Salmon Pink Bamboo Blend Yarn – Finish Step 2

Continue with 7 sc, 2 sc in ch 3 space, sc in between squares and 2sc in ch3 space until you get to the next corner.  5 sc in the corner ch 3 space and 6 sc across headband end, skipping over the center stitch which prevents the end from puckering.  5 sc in next corner and continue crocheting the second side, the same as the first.  When you get to the end, sc 2 in the first ch3 space and sl st in first sc.  It should look like this:

Crochet Headband in Salmon Pink Bamboo Blend Yarn - Finish Step 3

Crochet Headband in Salmon Pink Bamboo Blend Yarn – Finish Step 3

 For the next round, sc in each sc all the way around except for at the corners.  See picture for instructions on the corners.
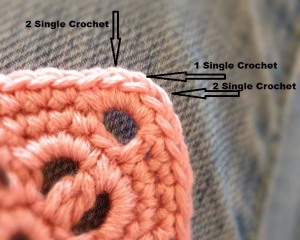
Crochet Headband - Corner Detail Instructions

Crochet Headband – Corner Detail Instructions

 Each corner should look like this when finished:

Crochet Headband - Corner Detail Finished

Crochet Headband – Corner Detail Finished

 Continue all the way around, slip stitch with the first sc and tie off.  It should now look like this:
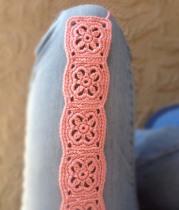
Crochet Headband - Finish Step 4

Crochet Headband – Finish Step 4

After tying off, yarn over and insert the hook into center sc at right corner.  Ch1.  Sc in each sc across until you reach the center corner sc on the left side.  Ch1, skip 1st sc and sc across to the 1st sc on previous row.  Ch1, skip 1st sc and sc in each sc across to the 1st sc in the previous row.  Continue to decrease stitches until there are 6 sc across.  Now it should look like this:

Crochet Headband - Finish Step 5

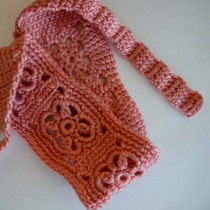
Now, after you’ve decreased to 6 stitches, ch 2 then dc across all 6 sc.  Continue making rows of 6 dc until the tie is long enough.  To measure, place the center square of the headband on the top of your head and pull the tie down until it’s long enough to tie a square knot with.  When you think it’s long enough, tie off and repeat the same instructions on the opposite side.  If it turns out that the tie isn’t long enough when you finish,  just add a few more rows until it’s the perfect length.  Then weave in any loose ands and trim.  Here’s the finished product. Crochet Headband in Salmon Pink Bamboo Blend Yarn - Finished!
 I hope these crazy instructions, though a bit unorthodox, were understandable.  If not, please comment on anything you don’t understand and I’ll try to clear up any confusion.  I used a lot of pictures for this pattern, but as I wrote in the first post, I’ve never actually written one of my patterns down.  I found it a bid difficult to communicate something that I’ve done intuitively for so long.  So, again, I apologize if it didn’t make sense.  Happy hooking !

Crochet Headband Pattern – Part Two

Crochet Headband in Salmon Pink (click on the picture to see this item in my Etsy Shop)

Crochet Headband in Salmon Pink (click on the picture to see this item in my Etsy Shop)

While reading over my last post (DIY – How to Make a Crochet Headband – Part One) I realized I’d forgotten a couple of important points.

(before I begin, I’ll just mention again, that if you don’t have the time or desire to make this headband yourself, I have many different styles available in my Etsy Shop – Catalina Inspired if you want to check them out.)

First, when you complete each square and tie it off, you should leave a 7″ – 8″ tail of yarn remaining before you cut.  This reduces the number of  ends you have to weave in.  If you’ve already woven the ends in, however, all is not lost.  I’ll explain more on that when I get back to the pattern.

The second point I forgot to mention concerns everyone’s personal style of crochet and resulting gauge.  The gauge (stitches per inch) can be pretty flexible in this pattern since the headband doesn’t need to be a specific width.  For reference purposes, my squares, using the bamboo blend yarn, end up being just a little more than 2″ square.  However, some people crochet tighter or looser stitches.  The squares are often a little tight around the edges (represented by a slight curl or pucker) but this is ok since we will be stitching around the outside of the squares which will stretch them a bit.  If you think your squares are really misshapen though, you can alter the pattern slightly to accommodate your own style.

For example, in round 3 of the motif, you can try doing 4 single crochets in each ch3 space instead of 5.  Of course, you will then need to subtract these stitches from the 4th round.

If any of this is confusing,  you’re having trouble with the pattern or something doesn’t make sense (an error on my part), please feel free to leave a comment with the details of your issue and I’ll be happy to help.

Ok, to pick up from where we left off in the last post…

You should now have 5 squares completed.  If you did leave a 7″ – 8″ tail of yarn off each square, here’s how to proceed.  You’ll need a large, plastic, blunt ended needle.  Line up 2 of the squares so that both tails are facing down off the bottom of each square and thread the needle like this (make sure the correct side of the square is facing up)…

Crochet Headband - Joining Two Squares - Step One

Crochet Headband – Joining Two Squares – Step One

Next, pass the needle through the center ch of the top, right ch3 space on the bottom square, like this:

Crochet Headband - Joining Two Squares - Step Two

Crochet Headband – Joining Two Squares – Step Two

Pull the thread through but leave enough slack so that the squares are still lined up.  Then pass the needle over and through the center ch on the bottom, right, ch3 space on the top square like this…

Crochet Headband - Joining Two Squares - Step Three

Crochet Headband – Joining Two Squares – Step Three

Now pass the needle under and back through the same center ch of the top right ch3 space on the bottom square.  Adjust the yarn at this point so that it’s not too tight or too loose going from the tie-off point to where it enters the first stitch.  As you sew the two squares together, make sure you catch the slack part of the yarn (from the beginning) in each stitch so that it cannot be seen.  Also, when sewing the two squares together, pass the needle only through the back loop (the two loops closest to each other) of the sc like this…

Crochet Headband - Joining Two Squares - Step Four

Crochet Headband – Joining Two Squares – Step Four

Continue joining the squares by sewing through the back loop all the way to the center ch of the ch 3 spaces on the left.  Weave the end back through and cut.  It should look something like this…

Crochet Headband - Joining Two Squares - Step Five

Crochet Headband – Joining Two Squares – Step Five

Continue joining the other three squares in the same manner.  If you didn’t leave a 7″ – 8″ tail of yarn on each square, all you have to do is cut a piece of yarn about 9″ long and sew the squares together in the same manner, only leaving about 2″ before the first stitch.   Sew over it as you go across the edges of the square. Here’s what the 5 squares should look like when they’re joined together…

Crochet Headband - All Five Squares Joined Together

Crochet Headband – All Five Squares Joined Together

Again, please feel free to comment with any issues or clarification of my instructions.  I realize I’ve been leaning heavily on pictures here, but I’ve never actually written one of my patterns down and I’m a visual person, so I think it comes across more clearly this way.  If not – let me know! Click here for part three of the crochet headband pattern

Happy hooking!!

DIY – How to Make a Crochet Headband – Free Pattern

DIY - How to Make a Crochet Headband

DIY – Crochet Headband in “Soft Sunshine” With Bamboo Blend Yarn

I’ve had several people ask about the pattern for crochet headbands I sell in my Etsy shop, Catalina Inspired.  So, by popular demand, the next few posts will provide step by step instructions on how to do just that.   The instructions are for the headband pictured above which is made using Caron Spa Yarn,  a blend of acrylic and sustainable bamboo in “soft sunshine”.  Michael’s craft stores usually carry this yarn.

The instructions for this headband assume a basic knowledge of crochet.   If DIY projects aren’t for you, please feel free to check out my shop where I have many types of crochet headbands available.

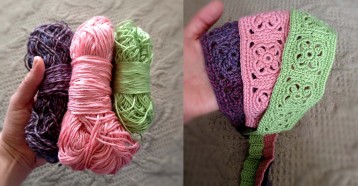
Through much experimentation, I’ve found some yarns that work well for making this headband.  The photo below shows my three favorites.

Different Types of Yarn You Can Use to Make a Crochet Headband

Different Types of Yarn You Can Use to Make a Crochet Headband. From L-R, wool mixed color, bamboo blend & cotton.

Crochet Headband in Wool - Creamy White and Teal/Sienna Mix

Crochet Headband in Wool – Creamy White and Teal/Sienna Mix. The yarn is fingering weight and is shown as an example of a headband made using very light weight yarn but is not recommended for this pattern.

From left to right, the yarns pictured are, Patons Kroy Wool Sock yarn in a purple/blue/gray mix, Caron’s bamboo yarn, mentioned above,  in a salmon pink and Patons Grace cotton yarn in sage green.  Each type of yarn requires a different hook size and sometimes, a slight change in the pattern.

I like the cotton and bamboo yarns for Spring and Summer headbands and the wools for winter.  I wear the headbands I make all the time, they tie for a custom fit and stay put on your head.  I like that they don’t slide back like so many headbands do.

The bamboo yarn is the largest size yarn I’ve used successfully.  Anything larger tends to be bulky in my opinion, but you may find you like that look.  I’ve used very light fingering yarn (pictured above) but I don’t recommend it for this particular pattern.

The yarn I’ll be using for this pattern is the Caron bamboo blend in a salmon pink, as pictured above.

This crochet headband pattern was designed by me, is copy-righted and free of charge.  Please feel free to use this pattern for personal use only.  I do sell these headbands in my Etsy Shop, Catalina Inspired,  so I’d appreciate credit for the design and that it not be used for re-sale.

I usually use a smaller hook than is called for on the yarn package.  The headband tends to hold its shape better and the tighter stitches also give the headband a good amount of stretch.

cl st = cluster stitch = yo, insert hook into correct stitch, draw up a loop. Yo and pull hook through 2 loops on hook. Yo, insert hook into same stitch and draw up a loop. Yo, pull hook through 2 loops on hook. Yo and pull through 3 remaining loops on hook.

sc = single crochet

sl st = slip stitch

ch = chain

yo = yarn over

For the purposes of this tutorial, I’ll be using crochet hook size F/4, although I usually use F/3 on the headbands I sell in my shop.  Since it’s harder to see what you’re doing when the stitches are so tight, I recommend using the larger size hook for the first one you make.

Using crochet hook size F/4 and the Caron Bamboo blend yarn previously mentioned, chain 4 and join with the first ch st using a sl st, or use a sliding loop.

Round 1 – ch1, 8 sc in loop, sl st in first sc.  You should have 8 single crochets going around the loop like so:

Beginning Round For Floral Motif Used in the Crochet Headband

Beginning Round For Floral Motif Used in the Crochet Headband

Round 2 – Ch 1, * sc in next sc.  Ch 3, cl st in next sc (instructions above).  Ch 3.  Repeat from * all around the loop.  Sl st to first single crochet.  When finished, there should be 8, ch 3 spaces and it should look like this:

Round 2 of Floral Motif for Crochet Headband

Round 2 of Floral Motif for Crochet Headband

Round 3 – ch 1, 5 sc in next ch 3 space.  5 sc in each ch 3 space on round and sl st to 2nd sc at the beginning of the round .  At the end of this round there should be 8 spaces with 5 sc in each and it should look like this:

Round 3 of Flower Motif for Chrochet Headband

Round 4 of the Floral Motif for the Crochet Headband

Round 4 of the Floral Motif for the Crochet Headband

Round 4 – Ch 1 , sc in next 3 sc.  Skip 1 sc, * ch 3.  Skip next sc.  Sc in next 4 sc.  Skip next sc, sc in the next 4 sc.  Repeat from *, 3 times.  Sl st to 1st sc at the beginning of the round and tie off.  Make 5 squares that look like this:

Connecting the 5 pieces, the next step in making the headband, will be covered in my next post.

Click here for part two of the Crochet Headband pattern.

Happy hooking!!