My Own Personal Sweat Shop

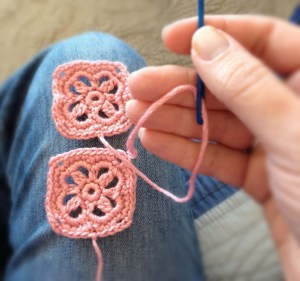
Hand Sewing Crocheted Squares Together For a Headband

Hand Sewing Crocheted Squares Together For a Headband

Being a craftsperson in the USA can be a real financial challenge which continues to worsen as the costs of raw materials, food and housing rise. To make matters worse, few of us have seen even a measly cost-of-living raise at our “day jobs” in years.

Sites like Etsy claim to support the small business artisan but after modifying their definition of “handmade” at the end of last year, mass produced items are springing up like weeds on the site that calls itself a “handmade marketplace”.  I’ve argued with artists who refuse to compete with inexpensive versions of what they create by hand, saying it’s a useless endeavor.

As of yet, I’ve been unable to reconcile my time and material costs with my prices.  I scour sale flyers and websites to get my materials at the lowest prices possible but where I usually hit a brick wall is with my hourly rate for labor.  If it takes me an hour to crochet one of my headbands, with costs subtracted out, I’d do better working as a…well…almost anything else.  Yet, I tread on, believing I will someday find the magic equation and actually be able to support myself doing what I love.  Is it really asking too much?  It’s actually asking a lot.

Putting it very simply, the average American can’t afford to buy goods that are manufactured or created in the United States.  This is nothing new globally as the same has been true of workers in China, India and other countries for hundreds of years but is unnerving in one of the most highly developed countries in the world.  The far majority of Americans buy clothing that’s made in another country.  The few who still work in the manufacturing industry probably can’t afford to buy the things they help manufacture.  I receive catalogs from “Fair Trade” companies who glossily advertise beautiful items that I couldn’t afford in my wildest dreams.  I want to buy fair trade, organic, natural, ecofriendly and items made in the USA but I just can’t afford to most of the time and have tried not to feel guilty about purchasing things that wear the dreaded “made in China” label.

When I was a child, my family went through some rough patches where money was pretty tight.  My stay-at-home mom made some of our clothing to save money.  Now, it’s hard to even find a fabric store.  After buying a pattern, fabric and notions for a garment you wish to sew, you could have bought three at Wal-Mart or Target, already made, for the same price.  There’s no reason to waste the time it takes to sew something by hand if it isn’t cost effective (for most of us anyway).

The global economy has been undergoing complex changes of which I understand at only the most rudimentary level, if at all.  I think most of us can see how these changes are affecting our daily lives as basic food prices rise while the containers in which they are sold shrink.  It’s really important that we are able to do what we love at some point during our lives even if it’s only for a couple hours a week and for those of us who are artists this may just have to be enough.

But still, I work towards my goal, even after my two other jobs and four year old, absorb most of my time.  After all, if you work hard enough and have faith in your dream, you can accomplish anything  – right?  A nice sentiment but not very realistic.

My First Tomato!

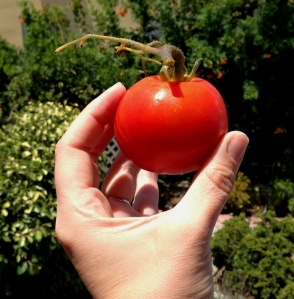
The First, Juicy, Red Tomato From My Organic Container Gardens

The First, Juicy, Red Tomato From My Organic Container Gardens

I’ve finally harvested my first batch of exactly four tomatoes from my container gardens.  The one pictured above was delicious and bright, juicy, red all the way through.  Aside from a few minor obstacles that were remedied pretty easily, including mule deer, aphids and cabbage worms, my baptism into vegetable gardening has been pretty successful.  Of course, this doesn’t count all the seeds that never sprouted or the few seedlings that didn’t make it past the first few hot days we had here but, oh well.

Southern, Coastal California is perfect for growing just about anything.  Especially here on Catalina Island, it never gets too hot, too cold or too dry (humidity-wise that is – we can go months without seeing a drop of rain).

I found a great organic, vegetable oil based pesticide that took care of the aphids and cabbage worms.  Pesticidal Oil by Worry Free Brand is what I used though it seems recently, that there are quite a few brands to choose from, which is great.  I rinsed the leaves and fruit well with water, then gave them a light misting with the oil after they had dried.  I had to re-apply once or twice more but it seemed to have done the trick.  The only drawback I’ve seen so far is that the tomatoes were just a bit sticky even after rinsing well with water but it doesn’t seem to have effected the taste.  I probably put too much oil on in the first place.

The mule deer on the island are really desperate for food considering the dry winter we had.  They even climb one flight of stairs on an almost nightly basis to get to our property and yummy plants.  At one point they were knocking large ceramic planters over and even breaking a couple in their early morning forays for food (usually around 4am).  I finally put deer netting up over all our plants including the shrubbery and they’ve pretty much given up for the time being.

I feel so bad for the poor deer since they’re probably starving to death but I know that feeding them is not the right thing to do.  We have a hunting season on the island but I’m not sure how I feel about that as a solution to the problem either.  I suppose if the hunters eat the deer they kill it’s okay, even though I’ve chosen to not eat any animal based foods myself.  Actually, if you’re going to eat meat, killing the animal yourself is probably the most humane way to go about it.

My Organic, Container Vegetable Garden

Container Veggie Garden

Container Veggie Garden – Tomato, Zucchini & Spinach

Is anyone else out there as freaked out as I am about the insane cost of groceries?  Here on Catalina Island all of our produce is brought over on a barge, in a refrigerated shipping container so it’s even more expensive than it is on the mainland. I couldn’t believe recently that one green bell pepper (yes green, not yellow or red) at our small market was almost two dollars!

I’m drawing on all the self-control I have to not roll right into a political/ socio-economic tirade. But be warned readers, I don’t know how much longer I can contain my frustration.

Anyway, to continue with the less controversial topic of gardening, since I’ve embarked on my juicer journey, I’ve obviously been buying a lot more fresh fruits and veggies than I  have in the past which is a good thing. Last year I’d decided to start a vegetable garden but just never got around to it, which is the fate of many grand ideas. This Spring I bought two large garden containers that were $45 each and the fact that I couldn’t return them was just the miserly incentive I needed to actually do it.

The containers I bought at our local hardware store are intended for city dwellers or those with limited outdoor space, hence the name “City Pickers”. They’re about 1′ 9″ x 2′ about 9″ deep and one of their greatest features is that they’re on wheels! If you think your spinach might be getting a bit too much sun, just wheel it over to a shadier spot.

I found this feature especially convenient last week when our neighbors were having their thirty-foot palm trees trimmed. Large fronds were dive-bombing to the ground right where my garden was, so I just wheeled them out of harm’s way until the tree-trimming was finished.

Watering the plants in the container is fool-proof.  There’s a plastic tube that rests on the bottom and comes through the soil at the top. The reservoir holds two gallons of water to replenish daily and a screen keeps the soil from direct contact with the water reservoir so the plants are never over watered (there’s an over-flow opening on each side). Just pour the water through the tube and it’s wicked up into the soil as needed.

I went into this project rather blindly since I’ve never actually grown vegetables before. I have plenty of experience with ornamental plants and even herbs but not veggies. My mom had a small vegetable garden in our back yard when we were kids, so she gave me some good general pointers.  She, however, lives in the wet, humid north-east, US (NJ) and I live in the very sunny, dry south-west, US (CA), so it’s a very different experience.

I’ve planted tomatoes, zucchini, bell peppers, green onions and spinach. As expected the zucchini and tomatoes are thriving but the others are having a slow start. I think it’s too hot and sunny for the spinach so I’m thinking of moving that container. There are 5 baby tomatoes on the vine and the squash plants have sprouted beautiful orange flowers, some of which, I hope, will eventually become squash.

I haven’t had too many problems with pests but one young tomato was eaten by a cabbage worm (I think) and I have seen some aphids.  I rinsed as many of the aphids off the leaves as I could, let them dry and sprayed a light mist of vegetable-oil based, organic pesticide to the leaves and it seems to have done the trick.

I’m hoping, in a couple of weeks, to have a great shot of me to post, biting into one of my own, home-grown, juicy, red, organic, tomatoes!  Here’s hoping!

How To Make An Awesome Veggie Burger From Juicer Pulp (Among Other Things)

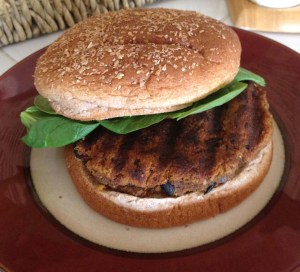
Easy Vegan Black Bean and Juicer Pulp Veggie Burger Recipe

Easy Vegan Black Bean and Juicer Pulp Veggie Burger Recipe

(Here are links to the first two posts on this subject)

Juicing – Healthy and Great Tasting! – 1/29/2013

What To Do With Juicer Vegetable Pulp – 2/9/13

Note:  The following recipe was created for juicer machine pulp but I think it would be a great recipe on its own with one or two substitutions that are suggested in the recipe – so if you don’t have a juicer – read on.

My veggie burger, juicer pulp journey has taken some interesting turns since last I posted.  I’ve learned a lot about the basics of cooking which,  if you’ve read my other posts on this subject, you’re already aware, that I’ve never been a big fan of cooking or even eating for that matter.  On March 1st I celebrated my one year anniversary of giving up all animal based products in my diet.  I have to admit that over the holidays I did cheat a bit and have some cookies here and there that I’m sure were made with dairy products but that was about it.  I even gave up one of my favorite appetizers, crackers and brie cheese.  I watched everyone else eating it and I was surprisingly satisfied with corn chips with salsa and a few other vegan dishes.

So, to update those who are just joining us, I’d asked for a Jack LaLane juicer for Christmas thinking it would give me a really easy way to get the nutrients I needed without cooking.  Well, this was true to a point but juicer pulp was just not something I’d considered.  I’m not sure what I thought would happen to the remainder of the fruits and vegetables after the juice was extracted  but it turns out that there’s quite a bit of pulp leftover.  My problem was, what I would do with it, as throwing it away or even composting was out of the question.

As of my last post I’d found a somewhat clumsy way of separating the vegetable and fruit pulps, when I discovered, by accident, that veggie pulp tasted pretty horrendous on oatmeal.  Well, I’ve backtracked quite a bit on that idea.  I’m no longer separating anything since the new veggie burger recipe I’ve finally perfected (very subjectively speaking) tastes great with either fruit, vegetable or mixed pulp.  I still use mostly veggie pulp in my humus spread recipe but you can toss just about anything (within the context of juicing, of course) into the veggie burger mix.

My first few veggie burger attempts turned out not so well.  I won’t repeat what my husband said when he tried one.  But through a lot of experimentation and many failures, I think I’ve finally come up with something that’s not too bad!  I actually like them but there are no guarantees to anyone with a finely tuned culinary palate.

So, without further ado…the recipe:

Vegan Black Bean and Juicer Pulp Veggie Burger

Makes about six patties.

4 Tbsp olive oil

1 16oz can black beans – well-drained and about the same volume of fruit &/or veggie juicer pulp.  In lieu of juicer pulp, the same volume of lentils or blended chick peas would work.  You can also experiment with spinach and broccoli or other veggies and fruits chopped finely in a food processor.  This portion of the recipe is a wild card.  Have fun with it!

1/2 medium-sized red onion – minced or chopped

2 tsp parsley (dried or fresh)

1 – 1.5 tsp salt

1.5 tsp chili powder

1.5 tsp garlic powder

1/4 tsp cumin

1/4 tsp turmeric

1/2 cup (approximate) fine bread crumbs or flour

Drain the black beans well and pour into a large mixing bowl.  Use a potato masher to turn the beans to a paste-like consistency but still with some whole or partially intact beans.  Next add the juicer pulp and use a rubber scraper to mix the beans and pulp thoroughly.  Now add the olive oil and remainder of ingredients.  Mix all the ingredients thoroughly.  Begin adding the bread crumbs or flour until you can make a ball with the batter in your hands and no liquid  seeps through your fingers.  Make a patty with the mixture and flatten consistently (be sure it isn’t thicker in the center).  At this point I grill the patties on my George Foreman Grill for about ten minutes but you can fry them in a pan with olive oil.  The latter method is obviously higher in fat if that’s a consideration.  It’s very important that the burgers are grilled thoroughly or the centers will be very mushy and unappetising.  I leave them on until the grill lines are really dark brown but not burned.

I usually make a batch or two and refrigerate them.  I throw them in the microwave at work then add spinach, ketchup, yellow mustard and a little tahini.  Yum!

If any real cooks out there have suggestions for improvement, I welcome them!  Bon Appetit!

What To Do With Juicer Vegetable Pulp


Humus and Veggie Pulp Sandwich Spread

Humus and Veggie Pulp Sandwich Spread

Ok, so I’m still mixing the fruit pulp that’s left over after juicing, in with my morning oatmeal and it’s working out pretty well (see previous post “Juicing – Healthy and Great Tasting“).  On the other hand, I’ve got a rapidly growing collection of veggie pulp in my freezer, stored in plastic bags and containers.  I’ve been working on ways to bring new life to these precious leftovers and some of my ideas have turned out pretty well, while others…not so much.

My favorite so far, from among the ideas that did work, is a veggie pulp and  humus sandwich spread.  I found a simple recipe for humus, added a bit more garlic, lemon juice and salt to the original recipe and mixed in some veggie pulp until the moisture consistency and flavor was just right.  Talk about simple!  Only one can of chick peas and about the same volume of veggie pulp yielded a large bowl of “spread” that lasted for days.  I call it a spread because I use it as a substitute for peanut butter between two slices of bread.  Seriously.  Did I mention that I really dislike cooking?  Ok, so this is probably a pretty bland idea for you Foodies out there but I’m sure you could dress it up with some cucumbers, spinach and tomatoes and make a really great sandwich or falafel.  By the way, the pulp I used for the batch pictured above consisted mostly of leafy greens and other green veggies but any mixture of veggies and maybe even a bit of fruit would work as well and the great part is that it’ll taste a bit different each time (unless, of course, you always use the same fruits and veggies with your juicer).

Here’s the simple humus recipe I used (before adding extra lemon juice, garlic and salt) as a base for my veggie spread:

1- 16oz can of chick peas

1/4 cup liquid from the can of chick peas

3-5 tbsp lemon juice

1.5 tbsp tahini

2 cloves crushed or minced garlic

1/2 tsp salt

2 tbsp olive oil

Simply combine all the ingredients in a food processor (little bits at a time) then spoon into a large mixing bowl.  Add veggie pulp until it reaches a paste consistency and tastes good to you.

I’m still working on my veggie burger recipe, which has had some rather unpleasant results thus far, but I’m determined to make it great.  As soon as I do, I’ll certainly share.

Any other ideas for veggie or fruit pulp?


Juicing – Healthy and Great Tasting!

Tomatos, Squash and Zuchinni Are Perfect Vegetables To Juice

Tomatoes, Squash and Zucchini Are Perfect Vegetables To Juice

Ok, I realize this post is a bit off-topic…again…but I just couldn’t contain my excitement.  I received a Jack LaLanne Power Juicer for Christmas and was anxious to share my newly acquired knowledge.  That being said, a guru, I am not!  I’m still a newbie in the world of juicing and I have a lot of learning to do.  It’s not as easy as it may at first appear but it’s definitely worth the time.  I can’t tell you how much better I feel since drinking just one glass of fresh juice per day.  I even find myself craving the newly discovered flavors and I have never been a vegetable lover.  My mom used to jokingly ask how I could call myself a vegetarian without eating any vegetables.  My diet was maybe healthier than the average person’s but not by much.

The inspiration for delving into the world of juicing was triggered by a fairly recent decision I’d made to eliminate all animal based foods from my diet.  I’d been a pseudo vegetarian for years, eating no meat at all but never having the discipline to completely eliminate one of my favorite foods, fish, from my diet. My reasoning was that since fish lived an essentially “natural” life up until they were caught, their suffering was minimal and short-lived.  In my distorted view, this made it morally acceptable to eat fish, or at least better than eating captive animals.  This rationale, of course, doesn’t take into account the environmental impact of commercial fishing, etc., but up till now, I’d decided to ignore these pesky details.

The film Forks Over Knives gave me the final push I needed to give up all animal based foods, including dairy, completely.  This decision initially created a huge dilemma that loomed awkwardly before me.  The problem was, I couldn’t stand to cook!  In other words, a “Foodie”, I was not!  How and what the heck would I eat?  So I dove clumsily into the world of Veganism and subsisted largely on cereal with soy (or rice) milk, curried rice and lentils, lots of humus, apples, oranges and bananas.

While watching yet another documentary film, Fat, Sick and Nearly Dead, a revelation began to form.  The subject of the film had decided to consume nothing but what came out of his juicer, for about two months, in order to detoxify his body and lose weight.  The juicer seemed like the answer to all my problems.  Not only would it add the nutrients I’d been lacking, but it looked fast, easy and didn’t appear to require many bowls, dishes or utensils that I would later have to wash.  My husband and I vowed to get one.

Jack LaLanne Power Juicer

Jack LaLanne Power Juicer

After Christmas was over and we were back in our own home, we excitedly ripped open the box and stared at the very complicated looking, shiny, machine.  Notes and stickers all over the box and machine stressed reading the instructions before proceeding any further.   This seemed to make good sense considering we could barely tell which way was up.  After using the juicer almost daily since then, I can agree that the instructions, most certainly, must be read, no matter how tempting it may be to start shoving apples down the chute. The Jack LaLanne Power Juicer is the first and only juicer I’ve used so I can’t comment on how any other juicers work.

Here’s some of what I’ve learned so far.  Fruits and vegetables produce varying ratios of juice to pulp. For example, apples produce a lot of juice and not very much pulp while a carrot produces a small amount of juice and leaves quite a bit of pulp behind.  Pulp??? – you ask?  What the heck is that?  I had a very similar reaction. After trying a couple of the recipes in the book the juicer came with (which were amazingly delicious), I looked into the pulp bin and asked myself, what do I do with this stuff ?  I went online but didn’t really find what I was looking for.

Juicer Pulp.  What's Left Over After Juicing

Juicer Pulp. What’s Left Over After Juicing

All the pulp left over after making a nice tall glass of juice presented me with quite a dilemma.  I have a compost bin but this was too much to simply “throw away” especially considering how expensive produce is now.  I had to find a purpose for this pulverized produce.

My first idea was to try separating the fruit pulp from the vegetable pulp by using plastic bags in the bin and switching them so that only fruit landed in one and only veggies in the other.  I figured I could at least mix the apple pulp with my oatmeal in the morning.

I spooned the first batch of separated apple pulp onto my oatmeal the next morning and could barely get it down.  It tasted awful!  As I rooted through my cereal, I found that there were pieces of green bell pepper, that I’d juiced earlier, mixed in with the apple.  For a moment I was puzzled as to how the pepper got mixed with the apple but I took a closer look at the machine and quickly realized that the pulp ended up all over the inside of the machine and not just in the pulp bin.

Juicer Pulp That's Left Under the Lid Of the Juicer

Juicer Pulp That’s Left Under the Lid Of the Juicer

The solution to this problem is to always juice fruits first and before replacing the bag, scrape the inside of the lid and filter with a rubber scraper to remove as much of the fruit pulp as possible.

The next morning’s oatmeal tasted great!  After juicing the apple, I place the bag in the fridge and just spoon it onto my cereal the next morning.

In my next post:  What to do with vegetable pulp?

Free Pattern, How To Make A Fringed Crochet Choker Necklace

Crochet Necklace With Wood Beads In Turquoise, Blue and Olive Green

Crochet Necklace With Wood Beads In Turquoise, Blue and Olive Green

I’ve made a rule, that before I’m allowed to buy any more yarn, I have to use all that I have, which is quite a lot.  I bought this yarn quite a while ago just because I liked it.  I had no real plan for what I’d do with it since it’s too thick to use for my  headbands.  For my headband pattern, I usually use sock yarn or something equally fine.  This is a flat ribbon yarn made with a polyester, acrylic blend.  I kept thinking what nice fringe it would make.  I designed these necklaces especially with this yarn in mind.This particular yarn is 1/8 inch or 3 mm wide and flat.  You may need to adjust the pattern if a different sized yarn is used.   I chose to use a traditional clasp but a crochet button and loop would probably work well too.

This pattern assumes a basic knowledge of crochet stitches and abbreviations.  My method of crochet is a bit unorthodox due to a problem I had with my left hand when I first learned, so I’m not the right person to give advice to beginners on how to hold the needle and form the stitches.  My post DIY – How to Make A Crochet Headband has a list of stitch abbreviations before the pattern.

If you’re not into DIY projects, or you just don’t have time, you can find these necklaces in my shop Catalina Inspired, in the section Crochet Jewelry.

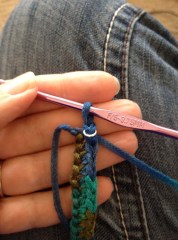
For this yarn I used a F/5-3.75mm hook.  First, chain 75.  If you’re using ribbon yarn, be sure to keep it flat as you wrap it around the hook.  If it twists, it can look sloppy.

Crochet Choker Step 2 - Add Clasp To End of Chain 75

Crochet Choker Step 2 – Add Clasp To End of Chain 75

If you’re using a traditional metal clasp, at the end of the chain, slide the remaining loop through one half of the clasp as pictured.

Next, chain 1 then sc in each chain stitch making sure the yarn stays flat.  The yarn can get quite twisted so sometimes I cut it making sure I’ve left enough to finish the row.  When you reach the end of the row, slip stitch in the 1st chain stitch, then slip the second half of the clasp over the last loop.   Chain 1.  It should look like this:

Crochet Choker Step 3 - Second Half Of Clasp

Crochet Choker Step 3 – Second Half Of Clasp

Now tie off the last stitch and weave the ends in.

Now cut four 8 1/2 inch lengths of yarn.  Carefully line them up so they are flat and lined up side by side then tie them in an overhand knot around the center of the necklace being very careful to keep the yarn flat and neat.  Carefully tighten the knot until it looks something like this:

Crochet Choker Step 4 - Knot Fringe Around Choker

Crochet Choker Step 4 – Knot Fringe Around Choker

When the knot is tied, lay the eight fringes out flat.  String some wood or glass beads on each length of fringe so they hang down straight and don’t tangle as easily.  I chose to knot the fringes at four different lengths like so:

Crochet Choker Step 5 - Tie Wood (or Glass) Beads To Each Fringe

Crochet Choker Step 5 – Tie Wood (or Glass) Beads To Each Fringe

The finished product should look something like this:Finished!  Crochet Choker Necklace With Wood Beads

Rustic Jewelry Hanger Using Upcycled Wood

 
Recycled Wood Jewelry Hanger by Kristy

Summer is really over now, although it doesn’t feel like it here on Catalina Island.  Even today it’s in the mid seventies and there are only a few wispy clouds and a bright blue sky beyond.  

My newest project is a collaborative effort.  My Dad (a retired Carpenter/Contractor) is making the bases for my rustic recycled jewelry hangers from wood he’s saved and repurposed.  The branches, which act as hooks to hang necklace or bracelets, are left over when I prune shrubs in the garden.  I lightly sand the branches and base and seal them with non-toxic, water based, varnish. 

Recycled Wood Jewelry Hanger by Kristy

This example has a hemp cord tie to hang it by and a hole in the back for a small nail.  I don’t really like how it hangs so I’ll be keeping this one as a prototype.  I think I’ve solved the problem of hanging it, so my next attempt will hopefully be featured in my Etsy Shop, Catalina Inspired.  It’s fun working on a project with my Dad and especially using recycled materials.

Recycled Wood Jewelry Hanger by Kristy

Autumn Kayaking on Catalina Island

Kristy kayaking off Catalina Island

Kristy kayaking off Catalina Island

Ok, I know I’ve said I’d be working hard at stocking my Etsy shop, Catalina Inspired,  for the holiday season, etc., but the beautiful weather we’ve been having here on Catalina Island just couldn’t be ignored.  Two days ago I went kayaking off Descanso Beach for a couple of hours and my arm muscles are still sore, but it was so worth it! 

The rocky Catalina Island coast meets beautiful blue-green water.

The rocky Catalina Island coast meets beautiful blue-green water.

A long bout of illness and the two-year old love of-my-life have kept me from kayaking for quite some time and I’ve really missed it.  I’m hoping to do some more kayaking  as long as the weather here holds out, which may not be very long since, according to weather reports, cool temperatures and rain are predicted early next week.  The great thing about Catalina, though, is that after the rain blows through, the weather could very possibly return to the way it is now, warm and sunny.

Kayaking off Catalina Island - Frog Rock

Kayaking off Catalina Island – Frog Rock

Anyway, enough about the weather and all the other wonderful distractions here on Catalina.  I really am going to get to work on my shop – any day now – really!

For more information about Catalina Island, check out my website Catalina Inspired.  To see my Etsy shop of the same name and my original Catalina Tile Designed Jewelry, click here:  Catalina Inspired on Etsy

Catalina Festival of Art

Me & My Ocean Side Booth at the Catalina Festival of Art

Me & My Ocean Side Booth at the Catalina Festival of Art

I’m finally getting around to writing about the Festival of Art we had here on Catalina Island, September 21, 22 & 23.  It was a beautiful weekend (which is no big surprise here in Southern California) though some complained that it was too hot.  Being originally from the east coast, where this summer it was scorchingly hot and humid, I thought it was perfect.  Not to mention, the nice warm to hot weather we’ve had this summer made the ocean water a refreshing 74 degrees F.  I was actually just swimming at Lover’s Cove Marine Preserve a couple of hours ago with my daughter, Mom & Dad and the water was crystal clear and the perfect temperature!  But, I digress. 

My Original Tile Design on Glass Necklace

My Original Tile Design on Glass Necklace

Some of My Crochet Headbands on Display  (click to see crochet headbands for sale at Catalina Inspired)

Some of My Crochet Headbands on Display (click to see crochet headbands for sale at Catalina Inspired)

I was so honored this year to receive an Honorable Mention for my tile jewelry from the Catalina Art Association!   Awards are given for the categories Fine Painting, Fine Jewelry, Fine Crafts and Photography.  I love the Art Festival each September here on Catalina Island.  I get to see so many islanders and fellow artists who are normally too busy in the summer for socializing (the winter here is another story – there’s plenty of free time). 

My Lotus Flower Notecards Made From Almost 100% Recycled Materials

My Lotus Flower Notecards Made From Almost 100% Recycled Materials

Now that the Art Festival is over, it’s time to enjoy the warm ocean water for a few more weeks before it becomes too cold and meanwhile,  start gearing up for the holidays!

Hope you are having a great day!

A Wave at Lover's Cove Marine Preserve on Catalina Island, California Channel Islands

A Wave at Lover’s Cove Marine Preserve on Catalina Island, California Channel Islands