My Own Personal Sweat Shop

Hand Sewing Crocheted Squares Together For a Headband

Hand Sewing Crocheted Squares Together For a Headband

Being a craftsperson in the USA can be a real financial challenge which continues to worsen as the costs of raw materials, food and housing rise. To make matters worse, few of us have seen even a measly cost-of-living raise at our “day jobs” in years.

Sites like Etsy claim to support the small business artisan but after modifying their definition of “handmade” at the end of last year, mass produced items are springing up like weeds on the site that calls itself a “handmade marketplace”.  I’ve argued with artists who refuse to compete with inexpensive versions of what they create by hand, saying it’s a useless endeavor.

As of yet, I’ve been unable to reconcile my time and material costs with my prices.  I scour sale flyers and websites to get my materials at the lowest prices possible but where I usually hit a brick wall is with my hourly rate for labor.  If it takes me an hour to crochet one of my headbands, with costs subtracted out, I’d do better working as a…well…almost anything else.  Yet, I tread on, believing I will someday find the magic equation and actually be able to support myself doing what I love.  Is it really asking too much?  It’s actually asking a lot.

Putting it very simply, the average American can’t afford to buy goods that are manufactured or created in the United States.  This is nothing new globally as the same has been true of workers in China, India and other countries for hundreds of years but is unnerving in one of the most highly developed countries in the world.  The far majority of Americans buy clothing that’s made in another country.  The few who still work in the manufacturing industry probably can’t afford to buy the things they help manufacture.  I receive catalogs from “Fair Trade” companies who glossily advertise beautiful items that I couldn’t afford in my wildest dreams.  I want to buy fair trade, organic, natural, ecofriendly and items made in the USA but I just can’t afford to most of the time and have tried not to feel guilty about purchasing things that wear the dreaded “made in China” label.

When I was a child, my family went through some rough patches where money was pretty tight.  My stay-at-home mom made some of our clothing to save money.  Now, it’s hard to even find a fabric store.  After buying a pattern, fabric and notions for a garment you wish to sew, you could have bought three at Wal-Mart or Target, already made, for the same price.  There’s no reason to waste the time it takes to sew something by hand if it isn’t cost effective (for most of us anyway).

The global economy has been undergoing complex changes of which I understand at only the most rudimentary level, if at all.  I think most of us can see how these changes are affecting our daily lives as basic food prices rise while the containers in which they are sold shrink.  It’s really important that we are able to do what we love at some point during our lives even if it’s only for a couple hours a week and for those of us who are artists this may just have to be enough.

But still, I work towards my goal, even after my two other jobs and four year old, absorb most of my time.  After all, if you work hard enough and have faith in your dream, you can accomplish anything  – right?  A nice sentiment but not very realistic.

Free Pattern, How To Make A Fringed Crochet Choker Necklace

Crochet Necklace With Wood Beads In Turquoise, Blue and Olive Green

Crochet Necklace With Wood Beads In Turquoise, Blue and Olive Green

I’ve made a rule, that before I’m allowed to buy any more yarn, I have to use all that I have, which is quite a lot.  I bought this yarn quite a while ago just because I liked it.  I had no real plan for what I’d do with it since it’s too thick to use for my  headbands.  For my headband pattern, I usually use sock yarn or something equally fine.  This is a flat ribbon yarn made with a polyester, acrylic blend.  I kept thinking what nice fringe it would make.  I designed these necklaces especially with this yarn in mind.This particular yarn is 1/8 inch or 3 mm wide and flat.  You may need to adjust the pattern if a different sized yarn is used.   I chose to use a traditional clasp but a crochet button and loop would probably work well too.

This pattern assumes a basic knowledge of crochet stitches and abbreviations.  My method of crochet is a bit unorthodox due to a problem I had with my left hand when I first learned, so I’m not the right person to give advice to beginners on how to hold the needle and form the stitches.  My post DIY – How to Make A Crochet Headband has a list of stitch abbreviations before the pattern.

If you’re not into DIY projects, or you just don’t have time, you can find these necklaces in my shop Catalina Inspired, in the section Crochet Jewelry.

For this yarn I used a F/5-3.75mm hook.  First, chain 75.  If you’re using ribbon yarn, be sure to keep it flat as you wrap it around the hook.  If it twists, it can look sloppy.

Crochet Choker Step 2 - Add Clasp To End of Chain 75

Crochet Choker Step 2 – Add Clasp To End of Chain 75

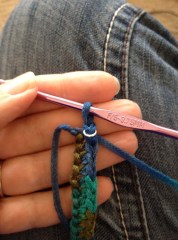
If you’re using a traditional metal clasp, at the end of the chain, slide the remaining loop through one half of the clasp as pictured.

Next, chain 1 then sc in each chain stitch making sure the yarn stays flat.  The yarn can get quite twisted so sometimes I cut it making sure I’ve left enough to finish the row.  When you reach the end of the row, slip stitch in the 1st chain stitch, then slip the second half of the clasp over the last loop.   Chain 1.  It should look like this:

Crochet Choker Step 3 - Second Half Of Clasp

Crochet Choker Step 3 – Second Half Of Clasp

Now tie off the last stitch and weave the ends in.

Now cut four 8 1/2 inch lengths of yarn.  Carefully line them up so they are flat and lined up side by side then tie them in an overhand knot around the center of the necklace being very careful to keep the yarn flat and neat.  Carefully tighten the knot until it looks something like this:

Crochet Choker Step 4 - Knot Fringe Around Choker

Crochet Choker Step 4 – Knot Fringe Around Choker

When the knot is tied, lay the eight fringes out flat.  String some wood or glass beads on each length of fringe so they hang down straight and don’t tangle as easily.  I chose to knot the fringes at four different lengths like so:

Crochet Choker Step 5 - Tie Wood (or Glass) Beads To Each Fringe

Crochet Choker Step 5 – Tie Wood (or Glass) Beads To Each Fringe

The finished product should look something like this:Finished!  Crochet Choker Necklace With Wood Beads

Autumn Kayaking on Catalina Island

Kristy kayaking off Catalina Island

Kristy kayaking off Catalina Island

Ok, I know I’ve said I’d be working hard at stocking my Etsy shop, Catalina Inspired,  for the holiday season, etc., but the beautiful weather we’ve been having here on Catalina Island just couldn’t be ignored.  Two days ago I went kayaking off Descanso Beach for a couple of hours and my arm muscles are still sore, but it was so worth it! 

The rocky Catalina Island coast meets beautiful blue-green water.

The rocky Catalina Island coast meets beautiful blue-green water.

A long bout of illness and the two-year old love of-my-life have kept me from kayaking for quite some time and I’ve really missed it.  I’m hoping to do some more kayaking  as long as the weather here holds out, which may not be very long since, according to weather reports, cool temperatures and rain are predicted early next week.  The great thing about Catalina, though, is that after the rain blows through, the weather could very possibly return to the way it is now, warm and sunny.

Kayaking off Catalina Island - Frog Rock

Kayaking off Catalina Island – Frog Rock

Anyway, enough about the weather and all the other wonderful distractions here on Catalina.  I really am going to get to work on my shop – any day now – really!

For more information about Catalina Island, check out my website Catalina Inspired.  To see my Etsy shop of the same name and my original Catalina Tile Designed Jewelry, click here:  Catalina Inspired on Etsy

Catalina Festival of Art

Me & My Ocean Side Booth at the Catalina Festival of Art

Me & My Ocean Side Booth at the Catalina Festival of Art

I’m finally getting around to writing about the Festival of Art we had here on Catalina Island, September 21, 22 & 23.  It was a beautiful weekend (which is no big surprise here in Southern California) though some complained that it was too hot.  Being originally from the east coast, where this summer it was scorchingly hot and humid, I thought it was perfect.  Not to mention, the nice warm to hot weather we’ve had this summer made the ocean water a refreshing 74 degrees F.  I was actually just swimming at Lover’s Cove Marine Preserve a couple of hours ago with my daughter, Mom & Dad and the water was crystal clear and the perfect temperature!  But, I digress. 

My Original Tile Design on Glass Necklace

My Original Tile Design on Glass Necklace

Some of My Crochet Headbands on Display  (click to see crochet headbands for sale at Catalina Inspired)

Some of My Crochet Headbands on Display (click to see crochet headbands for sale at Catalina Inspired)

I was so honored this year to receive an Honorable Mention for my tile jewelry from the Catalina Art Association!   Awards are given for the categories Fine Painting, Fine Jewelry, Fine Crafts and Photography.  I love the Art Festival each September here on Catalina Island.  I get to see so many islanders and fellow artists who are normally too busy in the summer for socializing (the winter here is another story – there’s plenty of free time). 

My Lotus Flower Notecards Made From Almost 100% Recycled Materials

My Lotus Flower Notecards Made From Almost 100% Recycled Materials

Now that the Art Festival is over, it’s time to enjoy the warm ocean water for a few more weeks before it becomes too cold and meanwhile,  start gearing up for the holidays!

Hope you are having a great day!

A Wave at Lover's Cove Marine Preserve on Catalina Island, California Channel Islands

A Wave at Lover’s Cove Marine Preserve on Catalina Island, California Channel Islands

Handmade Notecards With Recycled, Repurposed Paper Products

Lotus Flower Notecard Made Using All Recycled Materials

Lotus Flower Notecard Made Using All Recycled Materials

Handmade Recycled Paper Bead Necklace

Handmade Recycled Paper Bead Necklace

It’s been my mission for several years to find a purpose for all the catalogs, junk mail and other paper products I’m constantly throwing away or tossing in the recycle bin.  I’m a creative person, I thought, there must be a way to reuse and repurpose these raw materials. I’ve tried numerous notecard ideas, handmade paper, paper beads and more.  The problem has always been that, though the finished product may be beautiful, it simply took too long to assemble and therefore, wasn’t saleable. 

Monogram Letter A Notecards Made From Recycled Materials

Monogram Letter A Notecards Made From Recycled Materials

The lotus blossom notecards pictured at the beginning of this post are my latest attempt.  They’re made almost entirely from recycled materials.  The card stock came from cereal boxes, the white background paper was put together from junk mail or other scrap, the colored paper was taken from mail order catalogs and the brown paper on the back was once packing material.  Although it’s not recycled, the cards are fastened with sustainable hemp cord and the envelopes are made (elsewhere)from 100% recycled paper.

Lotus Flower notecards are all stamped on the back "Made Using Recycled Materials"

Lotus Flower notecards are all stamped on the back “Made Using Recycled Materials”

The lotus flower notecards, so far, have come the closest to being worth my while and I admit, they are fun to make.  I’ve listed several of these recycled cards in my Etsy shop, Catalina Inspired and I plan to offer them at the Catalina Festival of Art in two weeks along with my tile necklaces and crochet headbands.  Whether anyone else finds them as fun as I do, remains to be seen.

Summer on Catalina Island

Sunrise View of Avalon Harbor From My Window

Sunrise View of Avalon Harbor From My Window

I love living on Catalina Island but I must admit it can be rather distracting in the Summer.  I’m so lucky to have an amazing view of  Avalon Harbor and the Pacific Ocean right out my living room window.  It provides endless inspiration and beauty and I never tire of seeing it.  However, frequently in the Summer, those waving palm trees beckon me to come out and play.  The coconuty smell of suntan lotion wafts up to my window and it’s all over.  It’s all I can do to keep my mind on whatever I should be doing such as hotel business or projects for my Esty Shop. 


My Daughter & I at Lover's Cove on Catalina Island

My Daughter & I at Lover’s Cove on Catalina Island

Yesterday my daughter and I dropped what we were doing and went out to enjoy the Southern California sun.  It’s a slow time of year in the shop which makes for a great excuse when you’re looking for one.  The only problem is that it only fuels the fire.  That warm, clear, sea water sure did feel great!

Crochet Headband Pattern – Part Two

Crochet Headband in Salmon Pink (click on the picture to see this item in my Etsy Shop)

Crochet Headband in Salmon Pink (click on the picture to see this item in my Etsy Shop)

While reading over my last post (DIY – How to Make a Crochet Headband – Part One) I realized I’d forgotten a couple of important points.

(before I begin, I’ll just mention again, that if you don’t have the time or desire to make this headband yourself, I have many different styles available in my Etsy Shop – Catalina Inspired if you want to check them out.)

First, when you complete each square and tie it off, you should leave a 7″ – 8″ tail of yarn remaining before you cut.  This reduces the number of  ends you have to weave in.  If you’ve already woven the ends in, however, all is not lost.  I’ll explain more on that when I get back to the pattern.

The second point I forgot to mention concerns everyone’s personal style of crochet and resulting gauge.  The gauge (stitches per inch) can be pretty flexible in this pattern since the headband doesn’t need to be a specific width.  For reference purposes, my squares, using the bamboo blend yarn, end up being just a little more than 2″ square.  However, some people crochet tighter or looser stitches.  The squares are often a little tight around the edges (represented by a slight curl or pucker) but this is ok since we will be stitching around the outside of the squares which will stretch them a bit.  If you think your squares are really misshapen though, you can alter the pattern slightly to accommodate your own style.

For example, in round 3 of the motif, you can try doing 4 single crochets in each ch3 space instead of 5.  Of course, you will then need to subtract these stitches from the 4th round.

If any of this is confusing,  you’re having trouble with the pattern or something doesn’t make sense (an error on my part), please feel free to leave a comment with the details of your issue and I’ll be happy to help.

Ok, to pick up from where we left off in the last post…

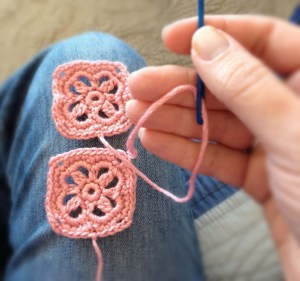
You should now have 5 squares completed.  If you did leave a 7″ – 8″ tail of yarn off each square, here’s how to proceed.  You’ll need a large, plastic, blunt ended needle.  Line up 2 of the squares so that both tails are facing down off the bottom of each square and thread the needle like this (make sure the correct side of the square is facing up)…

Crochet Headband - Joining Two Squares - Step One

Crochet Headband – Joining Two Squares – Step One

Next, pass the needle through the center ch of the top, right ch3 space on the bottom square, like this:

Crochet Headband - Joining Two Squares - Step Two

Crochet Headband – Joining Two Squares – Step Two

Pull the thread through but leave enough slack so that the squares are still lined up.  Then pass the needle over and through the center ch on the bottom, right, ch3 space on the top square like this…

Crochet Headband - Joining Two Squares - Step Three

Crochet Headband – Joining Two Squares – Step Three

Now pass the needle under and back through the same center ch of the top right ch3 space on the bottom square.  Adjust the yarn at this point so that it’s not too tight or too loose going from the tie-off point to where it enters the first stitch.  As you sew the two squares together, make sure you catch the slack part of the yarn (from the beginning) in each stitch so that it cannot be seen.  Also, when sewing the two squares together, pass the needle only through the back loop (the two loops closest to each other) of the sc like this…

Crochet Headband - Joining Two Squares - Step Four

Crochet Headband – Joining Two Squares – Step Four

Continue joining the squares by sewing through the back loop all the way to the center ch of the ch 3 spaces on the left.  Weave the end back through and cut.  It should look something like this…

Crochet Headband - Joining Two Squares - Step Five

Crochet Headband – Joining Two Squares – Step Five

Continue joining the other three squares in the same manner.  If you didn’t leave a 7″ – 8″ tail of yarn on each square, all you have to do is cut a piece of yarn about 9″ long and sew the squares together in the same manner, only leaving about 2″ before the first stitch.   Sew over it as you go across the edges of the square. Here’s what the 5 squares should look like when they’re joined together…

Crochet Headband - All Five Squares Joined Together

Crochet Headband – All Five Squares Joined Together

Again, please feel free to comment with any issues or clarification of my instructions.  I realize I’ve been leaning heavily on pictures here, but I’ve never actually written one of my patterns down and I’m a visual person, so I think it comes across more clearly this way.  If not – let me know! Click here for part three of the crochet headband pattern

Happy hooking!!

Spring Cleaning

I just ordered a ton of new jewelry making supplies in anticipation of summer here on Catalina Island and our Catalina Festival of Art in September.  As a result I figured I should mark down some items in my shop to make way for the new.

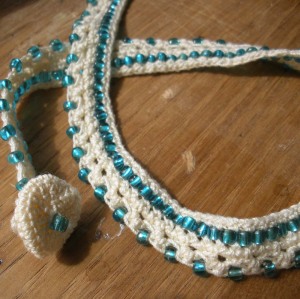
Hand Made Crochet Choker Necklace in Ivory with Teal Beads

Hand Made Crochet Choker Necklace in Ivory with Teal Beads

Spring Cleaning Sale at Catalina Inspired on Etsy

I’ll be adding more sale items in the upcoming days and after that, some of the new stuff I’m working on including some Catalina themed jewelry in gold and silver.